This resource will overview Microsoft Word. In the sections below, we will define some key terms and explain how to navigate Word.
What is Microsoft Word?
Microsoft Word is a word processor that allows you to edit and modify text, insert images, equations and symbols, and format documents based on display preferences.
What can you use Microsoft Word for?
You can use Microsoft Word to create a variety of documents, including reports, flyers and letters.
At university, you can use Word to complete all kinds of assessments, including essays and reports.
Glossary of terms
|
Dictionary |
A dictionary in Microsoft Word is a dictionary of words from the language you have selected that is used to check your spelling and grammar. You can add new words to your dictionary to customise it by right clicking on the word and selecting ‘Add to Dictionary’. Microsoft Word also has a thesaurus feature that can be accessed in the Review tab. |
|
Document |
A document refers to the file you are working on. Visually, it is the white page-like section that appears when Word is open. |
|
Markup |
The term markup refers to marks or highlights that indicate that a document has been changed. When you turn on ‘Track Changes’ in Word, you will see highlights, marks and comments that mark where changes have been made and how. |
|
Theme |
A theme is a collection of style choices, such as font, font size and colour, and heading formats that can be used to add consistency and visual appeal to your document. |
Navigating Word
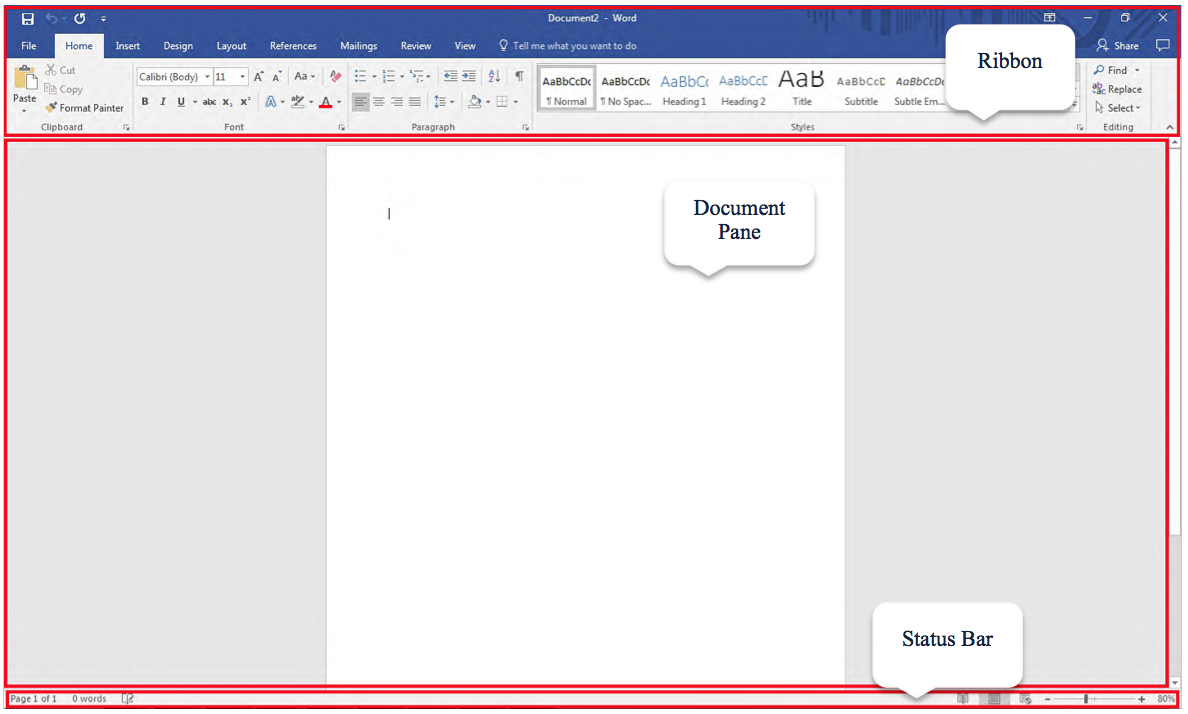
NOTE: This is an image of Word opened on a computer using the Windows operating system. The layout of Word will appear slightly differently on a computer using macOS.
|
Ribbon |
The Ribbon in Word contains the common Microsoft Program tabs detailed in our ‘Microsoft Office’ resource, as well as the Layout, References and Mailing tabs.
|
|
Document Pane |
The Document Pane is where your document is located – this is where you work by adding text and media to your document. |
|
Status Bar |
The Status Bar shows you key information about the document you are working on, including the page number, word count and whether there are any spelling or grammatical errors. |
Creating a document in Word
To create a new document in Word, click on ‘New’ in the File tab. The window that appears will look like the one above.
|
Adding text |
To add text to a document, click anywhere in the document within the Document Pane and begin typing. To format text, use the formatting tools in the Home tab. Using these tools you can change the font style, size and colour, create lists and format paragraphs. |
|
Inserting media |
To insert media into a document, including pictures, shapes and charts, select the content you would like to insert from those listed in the Insert tab and follow the prompts. When you add media, a new tab will appear in the Ribbon that will contain buttons to format that piece of media. For example, when you add a shape, the Shape Format tab will appear. |
|
Inserting page numbers |
To insert page numbers to your document, click on the ‘Page Number’ button in the Insert tab. Select where in the document you would like the page numbers to appear using the position and alignment drop-down menus. When you are happy, click on the ‘Ok’ button. Page numbers will now appear on your document. |
|
Inserting footnotes and endnotes |
To insert a footnote or endnote in your document, click next to the text you would like to reference using a footnote or endnote. Then click on either the ‘Insert Footnote’ or ‘Insert Endnote’ button in the References tab. A superscript number indicating the footnote or endnote will appear next to the text, and a space at the bottom or end of the document will appear for you to write your reference in. |
|
Inserting a table of contents |
To insert a table of contents, click on the ‘Table of Contents’ button in the References tab. Select the style you would like to use, and click on it to add it into your document. NOTE: To insert a table of contents, you will have to use the headings of that style (i.e. Heading 1, Heading 2 etc.) to structure your document, as Word relies on these headings to generate the table of contents. |
Reviewing your Word document
|
Checking spelling & grammar |
Unless you have turned it off, Word will automatically check the spelling and grammar of your document. Errors in your document will be indicated by either red or green squiggly underlines which indicate a misspelt word or grammar error respectively. You can right-click on an a word with an error to view Word’s suggestions to correct it. You can also check spelling and grammar by clicking on the ‘Spelling and Grammar’ button in the Review tab. A spelling and grammar window will appear, and you can cycle through each error and select options to correct or ignore it. |
|
Language |
The language of your document is the language Microsoft Word uses to check any spelling or grammar mistakes. You can change the language of your document by clicking on the ‘Language’ button in the Review tab and selecting the language you would like to use from the list provided. Click on ‘Ok’ when you have chosen the language. |
|
Tracking changes |
In Microsoft Office, you can track any changes made to your document using Track Changes. Using this tool, you can see the changes you or other people have made to your document. To track changes in your document, click ‘Track Changes’ in the Review tab. Any changes you make to the document will be indicated by different colour text or other markup, or will appear in a pane to the right of the document. You can also click on the ‘Reviewing Pane’ button to see a comprehensive list of changes. To accept a change, click on the ‘Accept’ button in the Review tab. The change will then appear as a part of your document with no mark up. To reject a change, click on the ‘Reject’ button next to the ‘Accept’ button. The change will disappear. |
|
Adding a comment |
To add a comment to a Word Document, highlight the section of text you would like to leave a comment on and click on the ‘New Comment’ button in the Review tab. A box will appear on the right-hand side of the document. Type your comment into the box. When you are finished typing, click anywhere in the document to leave the comment. |