How to Screenshot
In this resource, we will discuss the different ways to capture screenshots using both Windows and Mac computers.
Windows
There are two options to screenshot on a Windows computer. You can either use the Snipping Tool or the Prt Scr button on the keyboard. These are discussed in detail below.
Snipping Tool
The Snipping Tool is a free tool that is automatically made available with Windows Vista, Windows 7, Windows 8 and Windows 10.
It is a tool that allows you to capture screenshots of particular areas on the computer screen, rather than taking a screenshot of the entire screen.
How to use the Snipping Tool
- Launch the program by finding it in your Start Menu. You can do this by typing 'Snipping Tool' into the search bar in the Start Menu.
- Once you have pressed on the 'Snipping Tool' icon a window similar to the one below will appear.
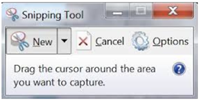
- By pressing on the 'New' button you can choose from different types of 'snips' such as Free-Form Snip, Rectangular Snip, Window Snip and Full-Screen Snip.
- Free-Form Snip: Scissors appear as the icon and this snip will allow you to draw an area that you might otherwise be difficult to capture as screenshot.
- Rectangular Snip: An addition symbol (+) will appear and this snip will allow you to take rectangular screenshots of your given area.
- Window Snip: A little hand icon will appear and you press the little hand on the area you will like to take a window screenshot.
- Full-Screen Snip: As soon as you press this option it automatically captures a screenshot of everything that is currently on your screen.
- Once you have chosen your desired snip and captured a screenshot another window with your screenshot will appear. In this window, you have the option to either retake a new snip, save a copy of your current snip or send to an email recipient as is.
Print Screen button on keyboard
On a Windows computer keyboard there is an option to print screen, which means you are taking a screenshot of everything that is on the screen rather than a small section. The print screen button can be found next to the Scroll Lock and Pause Break buttons on the keyboard, and is usually written as Prt Scr.
How to use the 'Prt Scr' key
- Press the 'Prt Scr' button on your keyboard just once and it will capture a screenshot for you.
NOTE: There will be no sound to indicate that this has occurred. - You can either paste the print screen image in the Paint application and make modifications there OR you can paste the screenshot directly into your document by clicking on the right button of the mouse and select the paste option form the menu that appears.
Mac
There are two options to take a screenshot using a Mac computer. You can either capture the whole screen or select a section of the screen to capture using keyboard shortcuts. These are discussed below.
Screenshot of the whole screen
How to take a screenshot of the whole screen
- Press and hold down Command (⌘) + Shift + 3 buttons on your keyboard at the same time.
- This will capture a screenshot of everything that is on your computer screen.
NOTE: If the volume on your computer screen is turned on you will hear the capture sound to signify that your screenshot was successful however if the volume on your computer is muted you will not hear anything. - The captured image will then automatically be saved on your Desktop as a .png file.
Selecting section to screenshot
How to take a screenshot of a portion of your screen
- Press and hold down the Command (⌘) + Shift + 4 buttons on your keyboards at the same time.
- You will see that the mouse pointer will change to a crosshair pointer (⌖).
- Move the crosshair pointer to a section on your screen where you want to take the screenshot.
- Press and hold down the left button on the mouse and drag the crosshair pointer to select an area.
NOTE: When you drag the crosshair pointer a grey box will appear to signify that the designated area is selected. - When you have selected the desired area, release the left button on the mouse. The crosshair pointer and the grey selection box will disappear. This signifies the end of the screenshot.
NOTE:If the volume on your computer screen is turned on you will hear the capture sound to signify that your screenshot was successful however if the volume on your computer is muted you will not hear anything. - The captured image will then automatically be saved on your Desktop as a .png file.