This resource will explain touch typing, and detail how to begin training yourself to touch type.
What is touch typing?
Touch typing is typing without looking at the keyboard. The fundamental idea is that each finger is given its own section of the keyboard and your fingers learn the location of the keyboard through practicing regularly and gaining muscle memory to eventually build up speed whilst typing.
Getting started with touch typing
Sitting posture to type
- Sit straight with your back straight, feet firmly touching the ground and with both elbows bent at the right angle.
- The screen is to be tilted upward allowing you to face the screen with your head slightly tilted forward.
- Keep a distance of 45-70cm between your eyes and the screen.
- Prevent strain of the shoulders, arms and wrist muscles by allowing the wrists to touch the tabletop in front of the keyboard. Never shift your body weight to your wrists by resting on them.
Home row position
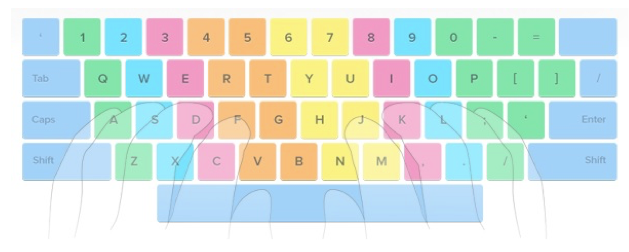
The home row is a section of the keyboard that is central to all the other keys (see image below). Positioning your fingers over the home row allows you to more easily reach the other keys on the keyboard. When touch typing, returning your fingers to what is referred to as the ‘home row position’ will assist you to type without looking at the keyboard.
(Image by Cy21. Original can be found https://commons.wikimedia.org/wiki/File:QWERTY-home-keys-position.svg)
To find the home row position:
- Locate the elevated “tabs”, without looking down, on the F and J keys. Place your left index finger on the F key, and your right index finger on the J key.
- Then place the fingers on your left hand on the A, S, D and F keys and the fingers on your right hand on the J, K, L and ; keys.
- Your fingers are now in the home row position.
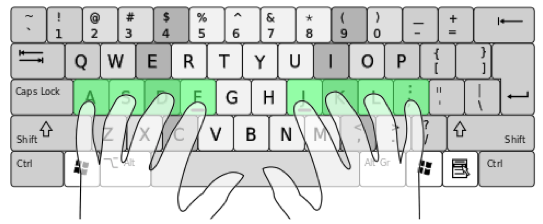
Keyboard layout
Each of your fingers has a specific area of the keyboard to cover, as shown in the image below. As you can see, your index, middle and ring fingers move either up or down from their home position, your thumb covers the space bar, and your pinky fingers cover the rest (both the green and dark blue keys).
(Image by Artur Mihno. Original can be found at https://commons.wikimedia.org/wiki/File:Keyboard_scheme.jpg)
To train yourself to touch type, you should always use the right fingers for the right keys, and return them to the home position when you have finished.
Tips for touch typing
- Do not give in and look at the keys if you get stuck. Just slide your fingers around until they find the elevated ‘tabs’ on the F and J keys and re-position your fingers into the home row position.
- Limit your hand and finger movement only to what is necessary to press a specific key by keeping your hands and fingers close to the base position. This will not only improve speed it will also reduce stress on the hands.
- Typing in a rhythm will aid you when touch typing, like you are playing a piano.
- Pay greater attention to the ring and pinky fingers when training, as they are considerably underdeveloped and undertrained.
- Take your time when you are learning to touch type. Only speed up when your fingers hit the right keys out of habit and it will progress with practice.